Consider the situation where you are developing an ASP.NET Core application that needs to support Azure B2C. Following the official Microsoft Document, you implement the Microsoft.Identity.Web library and three built-in User Flows. All is working well, but you also need to implement a Custom Policy. You find the following documentation which shows how to make a request with the B2C policy specified:
You try to implement this guidance. Everything compiles ok, but when you test the app, you encounter an IDX10501 error after the custom policy redirects back to the application. I might look like this:
![IDX10501: Signature validation failed. Unable to match key: kid: '[PII of type 'System.String' is hidden. For more details, see https://aka.ms/IdentityModel/PII.]'. Number of keys in TokenValidationParameters: '0'. Number of keys in Configuration: '1'. Exceptions caught: '[PII of type 'System.Text.StringBuilder' is hidden. For more details, see https://aka.ms/IdentityModel/PII.]'. token: '[PII of type 'System.IdentityModel.Tokens.Jwt.JwtSecurityToken' is hidden. For more details, see https://aka.ms/IdentityModel/PII.]'.](/wp-content/uploads/2023/03/image-1024x336.png)
This article is precisely about how to deal with this situation.
The Reason For The Error:
First, let’s understand why this error is being thrown when the custom policy redirects back to your app. In ASP.NET Core, whenever a user is authenticated and authorized, and there is a redirect back to the Web App containing an ID Token, the ASP.NET Core middleware will try to validate this ID Token to make sure that the redirect is genuine. In order to validate the ID Token, the Middleware needs the public key of the signing certificate which was used to sign the ID Token. The Middleware gets this public key by querying AAD B2C. Specifically, there is a “metadata” endpoint in AAD B2C used by the Middleware which provides authentication information including any public keys for signing certificates.
You may remember when creating your custom policy that you needed to create or upload a signing certificate. This signing certificate is different from that used for built-in user flows in AAD B2C. This means that the public keys accessible from the metadata endpoint for your AAD B2C will not contain the public key for your custom policy. The custom policy actually has it’s own metadata endpoint.
The endpoint which the Middleware uses is configured by Microsoft.Identity.Web and set at application startup. Since the metadata URL is already set, invoking a custom policy during runtime will result in a scenario where the Middleware is looking at the wrong metadata URL while validating the returning token.
The Solution:
In short, we need to configure the correct metadata endpoint for our additional Custom Policy.
We do this by creating a second authentication scheme to handle the custom policy. With this additional authentication scheme, we can set the correct metadata endpoint at startup. Below is a brief overview of the steps involved in actually carrying this out:
- Add an additional redirect URI to your App Registration
- Configure an additional B2C authentication scheme in your application
- Add an action to the desired controller
- Implement the created action in the Layout
Before continuing, please review the following prerequisites.
Note: an example application that demonstrates the results of the following steps can be found at the following link
https://github.com/mbukovich/ExtraB2CPolicyMVC
Prerequisites:
- An Azure B2C Directory. If you don’t have one, follow this guide – https://docs.microsoft.com/en-us/azure/active-directory-b2c/tutorial-create-tenant
- An App Registration for B2C Authentication. Here is a guide to create one if you don’t have one – https://docs.microsoft.com/en-us/azure/active-directory-b2c/tutorial-register-applications?tabs=app-reg-ga
- Standard User Flows set up. Look here for a guide to create a User Flow – https://docs.microsoft.com/en-us/azure/active-directory-b2c/tutorial-create-user-flows?pivots=b2c-user-flow
- Any Custom B2C Policy added to your B2C Directory: Documentation on creating a Custom Policy – https://docs.microsoft.com/en-us/azure/active-directory-b2c/tutorial-create-user-flows?pivots=b2c-custom-policy
- An existing ASP.NET Core Web App that successfully uses Microsoft.Identity.Web to handle B2C Authentication. You can use the following guide to create one – https://docs.microsoft.com/en-us/azure/active-directory-b2c/enable-authentication-web-application?tabs=visual-studio
Add an Additional Redirect URI to your App Registration
Using the same App Registration referred to in the Prerequisites, we will need to add another Redirect URI for the custom policy. The reason we cannot use the existing redirect URI for this situation is that doing so will confuse the Web App. We will be setting up two different authentication schemes, but when the B2C policy redirects back to the Web App, the Middleware will not know which authentication scheme to use. Thus, we need a separate redirect URI to clearly distinguish redirects from the existing and new authentication schemes.
Go to the Azure Portal at portal.azure.com, and navigate to your app registration. Once there, click on the “Authentication” blade on the left side of the screen. Under the existing redirect URI, add a new one. Copy and past the existing URI into the new one, and add a ‘-‘ to the existing URL and then whatever string you would like to define the callback endpoint for your application. In my example, my new redirect URI is “https://localhost:44321/signin-oidc-editemail”. Don’t forget to click “Save”!

Important Note:
You will need a separate redirect URI for each Authentication Scheme. This means if you are adding 2 Custom Policies (or more), then you will need to add 2 (or more) Authentication Schemes (one for each Policy), which means 2 (or more) redirect URIs.
Configure an Additional B2C Authentication Scheme
This process hinges around adding an action to your controller that will issue a challenge to the user. However, before we create this action, we need to properly configure the app with an additional authentication scheme. This means configuring the appsettings.json file as well as the Startup.cs file.
appsettings.json
Add the following JSON to your appsettings.json file:
"<name-of-your-configuration>": {
    "Instance": "https://<B2C-tenant-name>.b2clogin.com",
    "ClientId": "<client-id-of-your-app-registration>",
    "CallbackPath": "/<endpoint-of-your-new-redirect-uri>",
    "SignedOutCallbackPath": "/signout/<built-in-sign-in-sign-up-policy>",
    "Domain": "<B2C-tenant-name>.onmicrosoft.com",
    "SignUpSignInPolicyId": "<built-in-sign-in-sign-up-policy>"
},
This is how the appsettings.json file looks in my example application:
{
  "AzureADB2C": {
    "Instance": "https://markstestorganization1.b2clogin.com",
    "ClientId": "09717d12-ca7f-4388-8393-dafe42c0c3a5",
    "CallbackPath": "/signin-oidc",
    "SignedOutCallbackPath": "/signout/B2C_1_signupsignin1",
    "Domain": "markstestorganization1.onmicrosoft.com",
    "SignUpSignInPolicyId": "B2C_1_signupsignin1",
    "ResetPasswordPolicyId": "B2C_1_PasswordReset1",
    "EditProfilePolicyId": "B2C_1_editProfileTest1"
  },
  "AzureADB2CEditEmail": {
    "Instance": "https://markstestorganization1.b2clogin.com",
    "ClientId": "09717d12-ca7f-4388-8393-dafe42c0c3a5",
    "CallbackPath": "/signin-oidc-editemail",
    "SignedOutCallbackPath": "/signout/B2C_1_signupsignin1",
    "Domain": "markstestorganization1.onmicrosoft.com",
    "SignUpSignInPolicyId": "B2C_1_signupsignin1"
  },
  "Logging": {
    "LogLevel": {
      "Default": "Information",
      "Microsoft": "Warning",
      "Microsoft.Hosting.Lifetime": "Information"
    }
  },
  "AllowedHosts": "*"
}
Important Notes:
- The name of the second B2C configuration is arbitrary; you can name it whatever you want. We will using this extra configuration for a single custom policy, and if you want to add more custom policies, you will need to add an additional B2C configuration in the AppSettings.json file. For this reason, I recommend giving the JSON object a name associated with the Custom Policy.
- CallbackPath takes the String from the end of your Redirect URI from the previous step. Since my redirect URI is “https://localhost:44321/signin-oidc-editemail”, then my CallbackPath is “/signin-oidc-editemail”.
- You need to include your standard built-in sign-up-sign-in user flow in the Authentication Scheme in case the user tries to use your Custom Policy without being signed-in.
Startup.cs
Now we need to configure an additional authentication scheme in the startup.cs file. Within the “ConfigureServices” function, add the following code (added to line 52 in my example app):
// Create another authentication scheme to handle extra custom policy
services.AddAuthentication()
       .AddMicrosoftIdentityWebApp(Configuration.GetSection("<name-of-json-configuration>"), "<Arbitrary-name-for-Auth-Scheme>", "<Arbitrary-name-of-Cookie-Scheme>");

services.Configure<OpenIdConnectOptions>("<Arbitrary-name-for-Auth-Scheme>", options =>
    {
        options.MetadataAddress = "<Metadata-Address-for-Custom-Policy>";
    });
You will need to choose an arbitrary name for your authentication scheme, and an arbitrary name for the associated cookie scheme. Microsoft.Identity.Web will create the new authentication scheme and cookie scheme with the names you specified. You will also need to replace the text, “<name-of-json-configuration>,” with the name of the json configuration from the previous step. In my case, this would be “AzureADB2CEditEmail.”
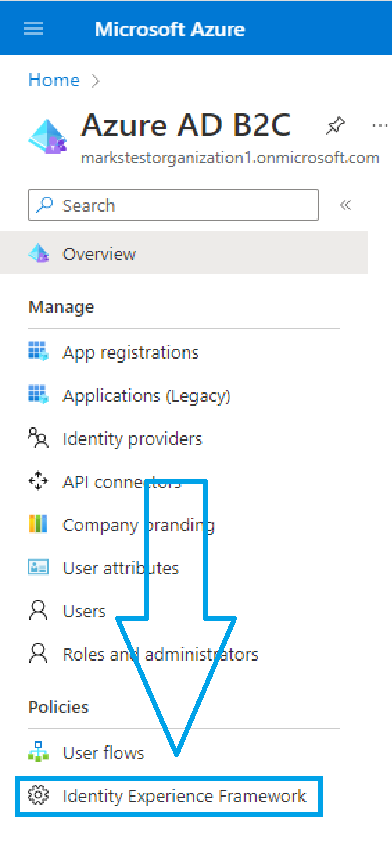
It is also very important to get the meta data address. This will be used by the middleware to get the information necessary to validate ID Tokens returned by the Custom Policy. The meta data address can be found in the Azure B2C Portal. On the left side of the screen, under “Policies,” click on “Identity Experience Framework” as indicated in the image below.
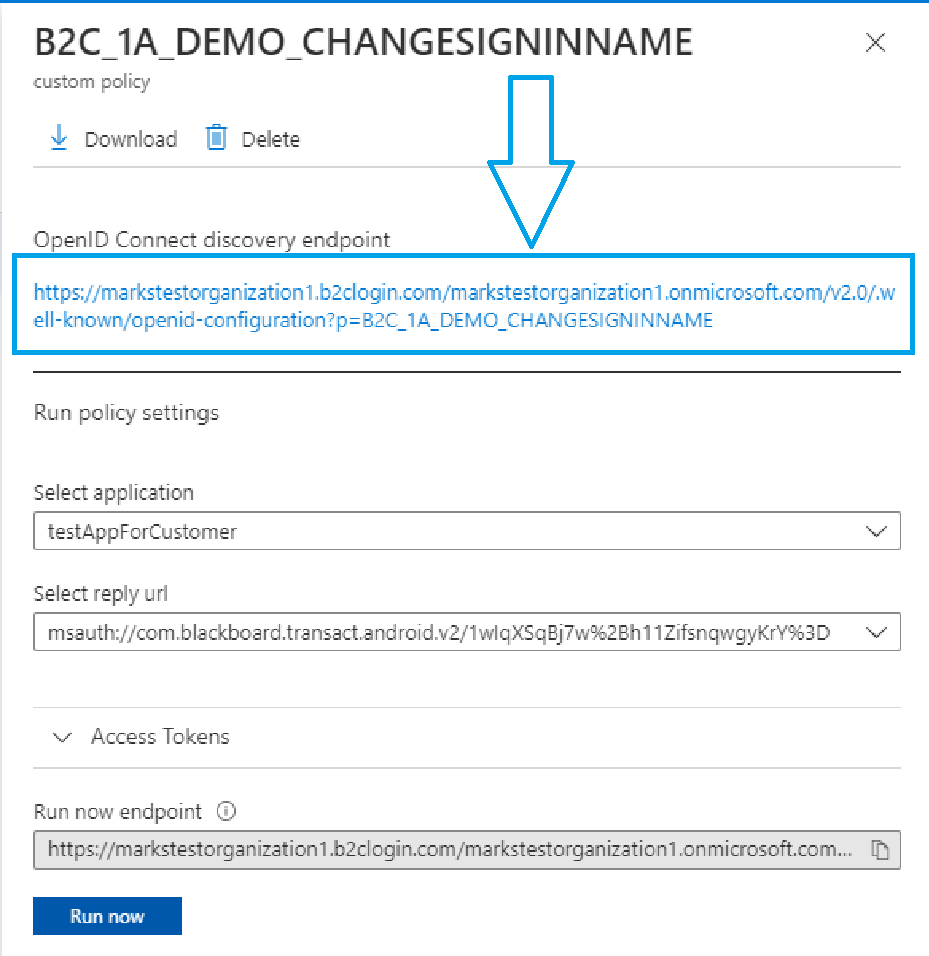
You will see your custom policies listed at the bottom of the page; click on the custom policy you are using for this guide. In my case it is “B2C_1A_DEMO_CHANGESIGNINNAME.”

In the dialog that opened up on the right side of the screen, the meta data address is the URL listed under “OpenId Connect Discovery Endpoint.” Copy this URL and paste it in for the value of the MetadataAddress variable.
Add Action to the Controller
Now we add an action to the desired controller to challenge the user with the Custom B2C Policy. In my example, I add the action to my Home Controller for the sake of simplicity. Add the following code to your controller and adjust the values and action name to meet your scenario (this code snippet can be found on line 40 of the “HomeController.cs” file in the “Controllers” folder in my example project):
[Authorize]
public IActionResult EditEmail()
{
    var redirectUrl = Url.Content("~/");
    var properties = new AuthenticationProperties { RedirectUri = redirectUrl };
    properties.Items["policy"] = "B2C_1A_DEMO_CHANGESIGNINNAME";
    return Challenge(properties, "B2CEditEmail");
}
Important Notes:
- Please rename the function to something that describes the action in your scenario.
- Change “B2C_1A_DEMO_CHANGESIGNINNAME” to the name of your custom policy.
- Change “B2CEditEmail” to whatever you named your custom policy authentication scheme. This is how the middleware will know which scheme and meta data address to use.
Implement the Action in the Layout
Now we need to implement the action in the layout so that the user can actually invoke the custom policy. In my example, I added a button alongside existing B2C buttons based on the tutorial mentioned in the prerequisites section; however, you can handle this in whatever way suits your layout and business requirements best.
If you want to follow the same idea that I used, then you can use the following snippet as an example of another list item added to the partial layout created in Step 4 of the tutorial linked in the 5th Prerequisite for this guide. (link: https://learn.microsoft.com/en-us/azure/active-directory-b2c/enable-authentication-web-application?tabs=visual-studio#step-4-add-the-ui-elements)
<li class="navbar-btn">
    <form method="get" asp-area="" asp-controller="Home" asp-action="EditEmail">
        <button type="submit" class="btn btn-primary" style="margin-right:5px">Edit Email</button>
    </form>
</li>
I added the snippet above to line 13 of the “_LayoutPartial.cshtml” file in the “Views/Shared” folder of my example project. Notice that the “asp-controller” property is set to “Home” in order to reference the Home Controller, and the “asp-action” property is set to “EditEmail” to reference the action created in the Home Controller.
If you have an existing app that doesn’t utilize the partial layout, and you just want a quick link to test the custom policy, you can use the following tag which creates a basic link. Replace the indicated values being sure to reference the correct controller if you didn’t add your action to the Home Controller:
<a asp-area="" asp-controller="Home" asp-action="replace-with-your-controller-action">Replace with text that describes the action</a>
Congratulations! Now you can run the Web App and test the solution.